Design guidelines for Selective Laser Sintering
File format
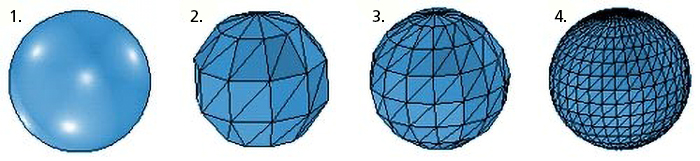
Your files must be in STL format and must be fully closed volumes, as open surface models cannot be printed. Make sure your STL file is of a high enough resolution to avoid the curved faces of your model being facetted.
Print size
The print size the machine is capable of is 193 mm x 242 mm x 321 mm
Costs to print
Students will be charged material cost to use the machine, which is between SEK 1.50/cm³ and SEK 3/cm³. Note that you will be charged for the enclosed volume of your part. This means that if, for example, you are printing an empty box, you will be charged for the material of a cube of the size of your box. This means that, if you fill your box with other components, they will not add to the cost as they fit within the same volume as the box.
What determines whether you get charged 1.50 or 3 SEK/cm³ is on whether your part should be 3D printed in the first place. If there is a better and more cost/effective way of making your part, and you are just using the 3D printer to be lazy then you will get charged SEK 3/cm³. If however your part is well suited to 3D printing then you will get charged SEK 1.50/cm3. Remember that 3D printing is a relatively expensive technology (in industry, you would get charge between 8 to 20 times more than here) and should only be used when it is the most appropriate technology.
Wall thickness
Normally, the minimum recommended wall-thickness for any part is 1 mm. Remember that most plastic consumer products have a wall-thickness of between 1 mm and 2.5 mm. Heavy duty industrial products may go up to 3 mm or 4 mm wall-thickness.
Avoid large masses
If you are printing an object that would contain a large mass of plastic, we suggest that you "shell" out the thick sections to a 2 mm wall thickness, and leave a hole somewhere for the powder inside the part to be removed from. If you print a part with big masses of plastic in it, or uneven wall-thicknesses, the part may warp.
Feature sizes
Normally the smallest feature that will still be visible on your print will be about 0.6 mm. This means that, if you have any details on your model that are smaller than 0.6 mm then they will not be visible on the printed part, so you are better off removing them from your model.
Threaded holes
If your model requires threaded holes then we recommend that you rather tap the holes after printing. If this is the case, don't forget to undersize your holes by the right amount for the tap size (pre-tap hole diameter = threaded hole diameter - thread pitch). In some cases it is possible to print threads, but they generally need to be M12 or bigger, and must be printed in the vertical direction.
Moving parts
If you are printing a model with moving parts, but printed as a single working assembly, you need clearance between the moving parts. The amount of clearance depends on the surface area that will be in close contact. In general, we recommend at least 0.5 mm clearance between moving parts. If the surface area that is in close contact is very large you may need more clearance, or consider printing the moving parts as separate parts that then get assembled after printing.
Tolerances
Remember to always leave tolerance between parts that will be assembled together. A 10 mm diameter pin will be extremely hard to insert into a 10 mm hole. Tolerances can vary greatly depending on the design, but a good rule-of-thumb is to leave at least 0.5 mm clearance. For example, if you are making a hole that you want to put an M4 screw through, make the hole 4.5 mm diameter.
Large models
If your model is too big to fit in the machine, we recommend that you cut your model in two, and add male/female groves or pins on each half to make them easier to glue together.